http://www.yelp.ca/biz/sassy-tuna-studio-st-johns
SassyTuna is now on Yelp, so if you have had an experience you would like to share, feel free to post!
As much as I love the caricatures, they always leave my hands, so they don't get posted much (by me).
It's usually an on-the-spot experience, so if you have feedback, feel free to share!

Friday, September 2, 2011
SassyTuna Survey Draw...
To celebrate the soon-opening SassyTuna Studio on Kings Road (Down from the street from Moo Moo's Ice Cream), over 250 surveys were sent out to customers and we did a draw for a fun SassyTuna prize pack! Who won?


 Thanks again to all those who helped me find some feedback, I really appreciate your time!

Monday, August 29, 2011

Tuesday, August 9, 2011


Monday, August 1, 2011
Quel Freddo Giorno!
Wandering Brush invited me to do some face-painting for the Holyrood Beach Cleanup this week. Dylan Cag is a complete expert, and has an amazing kit of colors and brushes! The themes you see here are all sea-oriented. The weirdest thing the children found on the beach cleanup was a sham-wow. . .
 Julie's Seahorse
 Julie learning to paint on faces, not paper!
 Dylan does line-painting...a great way to get through painting hundreds of children!
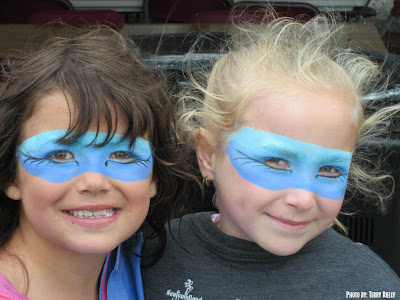 Dylan painted these beautiful girls with beautiful 'mermaid masks.'
 This enthusiastic boy loved Dylan's chomping eye-shark!
 Julie's Seahorse
 Julie learning to paint on faces, not paper!
 Dylan does line-painting...a great way to get through painting hundreds of children!
 Dylan painted these beautiful girls with beautiful 'mermaid masks.'
 This enthusiastic boy loved Dylan's chomping eye-shark!
Tuesday, June 28, 2011
Pufferfish Lantern
 1)Blow up a balloon, halfway is probably best! Too big and the lantern gets weak, too small and it's not too impressive!
2)Wrap 3-4 wires around your balloon, First, wrap around the neck of your balloon, and wrap all around the body of it, meeting at the neck again. Do another one or two this way, staggered around the balloon. Finally, thread one around the center, the other way...

3)A mix of flour, white glue, and water does the trick for our mâché paste; 1 part flour, 2 parts water, and a nice big blob of white glue, doesn't matter how much, just not more than the water! You can also use an old paintbrush to assist in stirring, then 'painting' your paper strips onto the balloon.

4)Now we're ready to mâché ! Tear a white tissue paper sheet into strips, then a coloured one. Starting with the white, completely cover the balloon, painting the strips on. Then put the coloured strips over. Keep the amount of paper you use to 2-3 sheets, or else the lantern becomes too thick to allow light through. Even though they look see-through now, once they dry, they are more opaque.


5)Dry over night. It is good to tie the neck of the balloon with a string and hang it somewhere harmless.

At this point, you can trace your sheet (There is a template sheet attached here, at the end, for your fish features) onto the appropriate colours, black, white, and whatever color your fish is, for example. (only black, white, and one other colour paper is needed)

6)Next morning, (DO NOT pop the balloon yet, I know you want to...) stick your eyes, fins, tail, and polka dots on with white glue. Do not use tape, it will not work! Let dry. Keeping the balloon inside will keep it strong until we are ready.
Again, there is a template sheet attached here for your fish features, and see the bottom photo as to where to glue them!

7)**NOW YOU CAN POP THE BALLOON** (YAY!) Take the rubber balloon out by the neck, and cut a quarter-sized hole in the end where the neck was. This is to put your LED light in later.

8)Poke a tiny hole in the top, and feed a thread down inside. Tip your balloon then, to let the thread escape through that quarter-sized hole you cut.

9) Tie a bead to that end of the thread. That way it can't fall out. And also you can tie beads to the other end of the thread, if you like.
 10) Put your LED light in, already turned on, all DONE! ;)

Happy Lanterning!
Thursday, June 2, 2011


Subscribe to:
Posts (Atom)